Ethereum DevOps with VSTS - easier now with new Truffle installer + npx
Last year I blogged about my first attempt to wrap a DevOps flow around Ethereum development. Since then there have been improvements in the way that Truffle is deployed with npm, the npx command that comes with npm 5.3.0 onwards, VSTS now supporting hosted Linux build agents, but also my familiarity with Linux, npm & Truffle have increased. I have spent a few weeks in my spare time trying to vastly streamline and simplify getting a basic pipeline going that provides: compilation, testing, migrating of solidity contracts using Truffle.
The steps I outline below will work on any build system, such as Jenkins or Team city that can run bash commands. But I have shown VSTS as that is what I am most familiar with.

Screenshot of the final result, with VTSTS showing Truffle test results for each build.
https://www.youtube.com/watch?v=ciIhS9wiiaM
A video where I walk through the entire process end to end.
Example configured project
I have created a repository in GitHub where I have done the below steps. So if you want to just clone it and try it out on your own build server, that will make it easier for you
https://github.com/DavidBurela/truffledevops
1. Configure npm development packages for your Truffle project
Add Truffle, TestRPC, Mocha & Mocha JUnit plugin as DevDependencies in your packages.json. This will allow the build server to later install these packages and then execute Truffle commands.
[code language="bash" gutter="false"]
# don't run npm init if your project already has a packages.json
npm init -y
npm install truffle mocha mocha-junit-reporter --save-dev
[/code]
2. Configure truffle.js
a) remove development network. Truffle test will spin up its own temporary network if there isn't a development network specified. Just make sure to remove the development network definition if one exists.
b) Mocha test reporter definition. We leave it as “spec” so that it will display the results in the console window while developing locally. Later on the build server we can change the reporter to JUnit, and the output file is already specified here ready for that.
[code language="js" gutter="false"]
module.exports = {
//...
// add a section for mocha defaults
mocha: {
reporter: "spec",
reporterOptions: {
mochaFile: 'TEST-truffle.xml'
}
}
};
[/code]
3. Build server settings
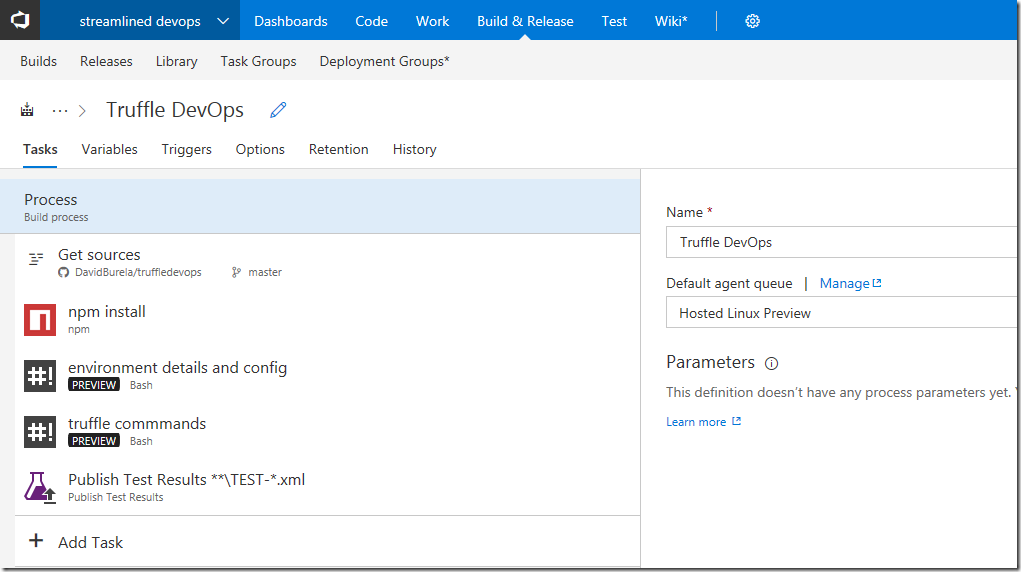
This screenshot shows what the end result looks like. It can be summarised as: get the tests, install the npm packages, configure any environment variables, run the Truffle commands, and collect the test results.
a) Get sources
Define where your code is sitting (e.g. VSTS, Github, Bitbucket, etc.)

b) npm install
The default npm install task. Will look in packages.json and install our dev dependencies so later we can run Truffle, TestRPC, etc.

c) Shell script – environment details and config
An inline script that spits out useful environment information to help debug if things go wrong.
It also importantly replaces the line in our truffle.js to change the test reporter to the console UI, to output the results into a .xml file in JUnit format
[code language="bash" gutter="false"]
# output version details for debugging
node -v
npm -v
npx truffle version
# string replace the mocha reporter to junit output
sed -i -e 's/reporter: "spec"/reporter: "mocha-junit-reporter"/g' truffle.js
[/code]
d) Shell script – truffle commands
Inline script that executes the local version of Truffle with npx. I like have all 3 lines, so if something breaks we can see where it happened.
[code language="bash" gutter="false"]
# check the contracts compile
npx truffle compile
# run unit tests
npx truffle test
[/code]


